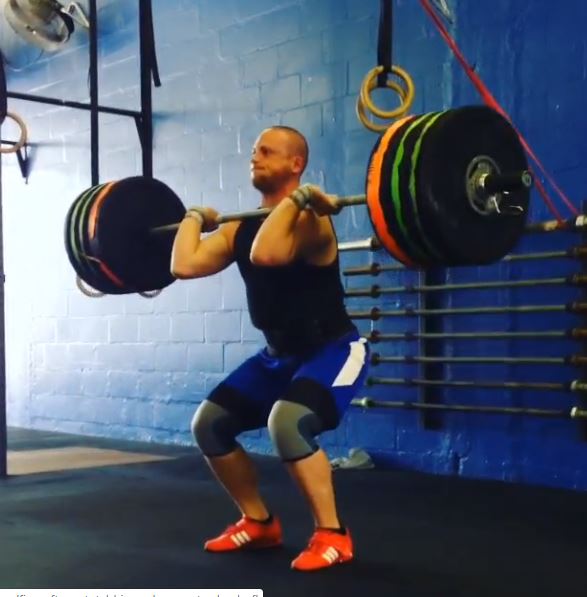
Great job Mike! BEAST MODE!
I had to share this. My cousin and good friend Mike just hit a PR at 260lbs on his Clean n’ Jerk. Great form too!
Currently he his on week 9 of 10 in the Advanced 2-Phase Cycle from Catalyst Athletics. He has hit 4 PRs during this cycle with one only week left. Mike has seen great progress and highly recommend Catalyst. This is the second cycle he has have done with them and cant say enough about how much he enjoys the programming. Great job and keep up the hard work Mike!
Lets break down the biomechanics of the Clean n Jerk
Rippetoe, Mark (2012-01-13). Starting Strength (Kindle Locations 4657-4662). The Aasgaard Company. Kindle Edition.
Stance
The stance should be the same as that used in the deadlift. Toes will be slightly pointed out for the same reasons they were in the deadlift: femur and torso clearance and the involvement of more adductor and external rotator muscle mass.
Floor to Pull
The knee angle, hip angle, and back angle are the same for the power clean’s pull off the floor as for the deadlift. The bar should be 1–1½ inches from your shins. For almost every human being on the planet, this distance places the bar directly over the middle of the foot, the position over which the bar stays on its way up to jump. With your grip secure, bend your knees and drop them forward just to the point where the shins touch the bar. Again, DO NOT MOVE THE BAR, since it is already where you want it over your foot. Hips do not drop down during this movement – only the knees and shins move. Once the shins are touching the bar, the hips freeze in position. They do not drop any farther. Now shove your knees out just a little to establish the slight angle of the thighs and knees that keeps them parallel to your feet. Knees will be in contact with elbows after this happens, and that is fine. The correct grip width will have the clearances very close during the pull, and if the grip is correct and the thighs are externally rotated a little, the knees will touch the elbows. Most people will try to lower their hips during this step. If you do this, you will push your knees forward, thus pushing the bar forward. Just touch the bar with the shins and shove your knees out just a little.
Chest Up
This will be the most difficult step for most people: squeeze your chest up into the deadlift start position. Lifting the chest is accomplished by using the muscles of the upper back, and this starts a process of spinal extension that finishes at the pelvis. While gripping the bar, being careful NOT TO MOVE IT, shove your rib cage up so that your chest rotates up between your arms. Let this contraction continue down your back until your lumbar spine is tightened into contraction as well. In this way, your back is properly positioned for you to pull without dropping your hips – the back will have positioned itself correctly so you can pull from the top down instead of by lowering the hips, which would shove the bar forward. DO NOT try to squeeze your shoulder blades together in the back; scapular adduction will pull you down closer to the bar into a position that you cannot maintain with a heavy weight because that’s not where your shoulder blades actually stay during a pull. When you are in the correct position, stare at a point 12–15 feet in front of you on the floor so that your neck can assume its normal anatomical position. You might need to think about keeping your chin down, too. This step will be difficult because of hamstring tension fighting against the proper extension of the lower back. The picture below highlights this concept during a squat technique

Remember: The back muscles and the hamstrings are in a war for control over your pelvic position, and the lower back must win. During this step, most people will try to drop their hips. If you do this, the bar will roll forward of the mid-foot. Your hips will probably be higher than you want them, especially if you have been deadlifting using another method. Keep your hips up, and compensate for this weird feeling by squeezing the chest up even more. After you do a few deadlifts and your hamstrings get warm, the movement will feel better and more familiar.
Pull
Take a big breath and drag the bar up your legs. This means exactly what it says: “drag” implies contact, and the bar never leaves contact with your legs on the way up to lockout. This step will be the first time that the bar actually moves at all, and if you do it correctly, the bar path will be a straight vertical line, starting at its position directly over the mid-foot and ending at the top at arms’ length with your chest up, knees and hips in extension, spine in the normal anatomical position, and feet flat on the floor. If at any time during the pull the bar leaves your legs – which often happens as the bar gets above the knees and near the thighs – it will be off balance, forward of your mid-foot.
Jump Shrug
This last point is very important, so much so that the jumping position can be thought of as both the knees-and-hips-unlocked position and the place where the bar touches the thighs. You find this place by positioning your hips and legs to jump. It is always the last place you should feel the bar until you catch it on your shoulders, and if you don’t feel the bar on your thighs when you clean, it is wrong. This point cannot be emphasized enough: the bar being in contact with your thighs means that it’s in the proper place in balance over the mid-foot, and that you are in the correct place to jump. Make it your policy to touch your thighs each time you clean. Now, from the jumping position, with straight elbows, jump straight up in the air with the bar hanging from your arms. Don’t bend your elbows. Concentrate on the fact that you are jumping and leaving the ground. Jump as high as you can, enough that you have to fully extend your knees and hips to do it. Focus on your jump the first few times, and then focus on keeping your elbows extended. It will be normal at this point to shift your feet from the stance used for pulling into a stable position for catching the bar in the rack position. For most people, this racking stance will approximate the squat stance because it will be familiar from squatting, and because the bent knees are used to absorb the weight of the dropping body and barbell best distribute the load to the ground in this position. Don’t worry about the stance at this point unless your feet move laterally wider than your squat stance. Think hard about not bending your elbows as the bar slides down your thighs to the jumping position. Many people will try to bend their elbows instead of letting the bar slide, but don’t you be that person. If you find that you’re bending your elbows anyway, use your triceps to lock the elbows in.
Once the act of jumping with the bar in your hands and with your elbows straight is firmly embedded, jump and catch the bar on your shoulders in the rack position. Catch it in the same place you had it before, with your elbows up. The bar should stop on your shoulders, not in your hands. Slam your elbows up into the rack position from the top of the jump – go from elbows-straight directly to slammed-forward. Aim your shoulders at the bar and jam them into it without thinking about raising your elbows, as if there is no step between straight elbows and the rack position. Jumping is the key. The power clean is not an arms movement, at all, and if you first learn that a jump with straight arms is the core of the movement, you will never learn to arm-pull the bar. The jump generates the upward movement of the bar, and later, when your form is good, you will think of the jump as an explosion at the top of the pull. For now, just jump and slam the bar onto the shoulders. Each time, be sure that 1) you start from the jumping position with the bar touching the thighs and your elbows straight, 2) you actually jump, and 3) you rack the bar with your elbows up high. Check the position of the bar as it passes your chest: it should be close enough that it touches your shirt. The bar should follow a vertical line.
Rack
It should sit right on top of the frontal deltoids (the meaty part of the front of the shoulders), well away from the sternum and collarbones. This position is referred to as the rack position. The key to this position is the elbows: they must be up very high, pointed straight forward, with the humerus as nearly parallel to the floor as possible. Some people will have trouble getting into this position due to flexibility problems. A grip width adjustment usually fixes this, especially if the forearms are longer than the upper arms. Widen the grip a little at a time until the position is better. If your elbows are up high enough, the bar will clear the bony parts and sit comfortably on the bellies of the deltoid muscles. The bar should not be sitting in the hands, and the hands are not supporting any of the weight. The weight is resting on your shoulders, and your hands are trapping it in position between your arms and shoulders, just like they do in the squat. This position is secure and pain-free to the extent that you will never in your entire life clean a weight that will be too heavy to hold like this. It is imperative that you understand that this is where the bar goes and not anywhere else – not sitting on your chest, and not just carried in your
Jerk
Keeping pressure on heels, dip body by bending knees and ankles slightly. Explosively drive upward with legs, driving barbell up off shoulders. Drop body downward and split one foot forward and other backward as fast as possible while vigorously extending arms overhead.The split position places front shin vertical to floor with front foot flat on floor. The rear knee is slightly bent with rear foot positioned on toes. The bar should be positioned directly over ears at arms length with back straight.Push up with both legs. Position feet side by side by bringing front foot back part way and then rear foot forward.
Rippetoe, Mark (2012-01-13). Starting Strength (Kindle Locations 4657-4662). The Aasgaard Company. Kindle Edition.

 Remember: The back muscles and the hamstrings are in a war for control over your pelvic position, and the lower back must win. During this step, most people will try to drop their hips. If you do this, the bar will roll forward of the mid-foot. Your hips will probably be higher than you want them, especially if you have been deadlifting using another method. Keep your hips up, and compensate for this weird feeling by squeezing the chest up even more. After you do a few deadlifts and your hamstrings get warm, the movement will feel better and more familiar.
Pull
Take a big breath and drag the bar up your legs. This means exactly what it says: “drag” implies contact, and the bar never leaves contact with your legs on the way up to lockout. This step will be the first time that the bar actually moves at all, and if you do it correctly, the bar path will be a straight vertical line, starting at its position directly over the mid-foot and ending at the top at arms’ length with your chest up, knees and hips in extension, spine in the normal anatomical position, and feet flat on the floor. If at any time during the pull the bar leaves your legs – which often happens as the bar gets above the knees and near the thighs – it will be off balance, forward of your mid-foot.
Jump Shrug
This last point is very important, so much so that the jumping position can be thought of as both the knees-and-hips-unlocked position and the place where the bar touches the thighs. You find this place by positioning your hips and legs to jump. It is always the last place you should feel the bar until you catch it on your shoulders, and if you don’t feel the bar on your thighs when you clean, it is wrong. This point cannot be emphasized enough: the bar being in contact with your thighs means that it’s in the proper place in balance over the mid-foot, and that you are in the correct place to jump. Make it your policy to touch your thighs each time you clean. Now, from the jumping position, with straight elbows, jump straight up in the air with the bar hanging from your arms. Don’t bend your elbows. Concentrate on the fact that you are jumping and leaving the ground. Jump as high as you can, enough that you have to fully extend your knees and hips to do it. Focus on your jump the first few times, and then focus on keeping your elbows extended. It will be normal at this point to shift your feet from the stance used for pulling into a stable position for catching the bar in the rack position. For most people, this racking stance will approximate the squat stance because it will be familiar from squatting, and because the bent knees are used to absorb the weight of the dropping body and barbell best distribute the load to the ground in this position. Don’t worry about the stance at this point unless your feet move laterally wider than your squat stance. Think hard about not bending your elbows as the bar slides down your thighs to the jumping position. Many people will try to bend their elbows instead of letting the bar slide, but don’t you be that person. If you find that you’re bending your elbows anyway, use your triceps to lock the elbows in.
Once the act of jumping with the bar in your hands and with your elbows straight is firmly embedded, jump and catch the bar on your shoulders in the rack position. Catch it in the same place you had it before, with your elbows up. The bar should stop on your shoulders, not in your hands. Slam your elbows up into the rack position from the top of the jump – go from elbows-straight directly to slammed-forward. Aim your shoulders at the bar and jam them into it without thinking about raising your elbows, as if there is no step between straight elbows and the rack position. Jumping is the key. The power clean is not an arms movement, at all, and if you first learn that a jump with straight arms is the core of the movement, you will never learn to arm-pull the bar. The jump generates the upward movement of the bar, and later, when your form is good, you will think of the jump as an explosion at the top of the pull. For now, just jump and slam the bar onto the shoulders. Each time, be sure that 1) you start from the jumping position with the bar touching the thighs and your elbows straight, 2) you actually jump, and 3) you rack the bar with your elbows up high. Check the position of the bar as it passes your chest: it should be close enough that it touches your shirt. The bar should follow a vertical line.
Rack
It should sit right on top of the frontal deltoids (the meaty part of the front of the shoulders), well away from the sternum and collarbones. This position is referred to as the rack position. The key to this position is the elbows: they must be up very high, pointed straight forward, with the humerus as nearly parallel to the floor as possible. Some people will have trouble getting into this position due to flexibility problems. A grip width adjustment usually fixes this, especially if the forearms are longer than the upper arms. Widen the grip a little at a time until the position is better. If your elbows are up high enough, the bar will clear the bony parts and sit comfortably on the bellies of the deltoid muscles. The bar should not be sitting in the hands, and the hands are not supporting any of the weight. The weight is resting on your shoulders, and your hands are trapping it in position between your arms and shoulders, just like they do in the squat. This position is secure and pain-free to the extent that you will never in your entire life clean a weight that will be too heavy to hold like this. It is imperative that you understand that this is where the bar goes and not anywhere else – not sitting on your chest, and not just carried in your
Jerk
Keeping pressure on heels, dip body by bending knees and ankles slightly. Explosively drive upward with legs, driving barbell up off shoulders. Drop body downward and split one foot forward and other backward as fast as possible while vigorously extending arms overhead.The split position places front shin vertical to floor with front foot flat on floor. The rear knee is slightly bent with rear foot positioned on toes. The bar should be positioned directly over ears at arms length with back straight.Push up with both legs. Position feet side by side by bringing front foot back part way and then rear foot forward.
Rippetoe, Mark (2012-01-13). Starting Strength (Kindle Locations 4657-4662). The Aasgaard Company. Kindle Edition.
Remember: The back muscles and the hamstrings are in a war for control over your pelvic position, and the lower back must win. During this step, most people will try to drop their hips. If you do this, the bar will roll forward of the mid-foot. Your hips will probably be higher than you want them, especially if you have been deadlifting using another method. Keep your hips up, and compensate for this weird feeling by squeezing the chest up even more. After you do a few deadlifts and your hamstrings get warm, the movement will feel better and more familiar.
Pull
Take a big breath and drag the bar up your legs. This means exactly what it says: “drag” implies contact, and the bar never leaves contact with your legs on the way up to lockout. This step will be the first time that the bar actually moves at all, and if you do it correctly, the bar path will be a straight vertical line, starting at its position directly over the mid-foot and ending at the top at arms’ length with your chest up, knees and hips in extension, spine in the normal anatomical position, and feet flat on the floor. If at any time during the pull the bar leaves your legs – which often happens as the bar gets above the knees and near the thighs – it will be off balance, forward of your mid-foot.
Jump Shrug
This last point is very important, so much so that the jumping position can be thought of as both the knees-and-hips-unlocked position and the place where the bar touches the thighs. You find this place by positioning your hips and legs to jump. It is always the last place you should feel the bar until you catch it on your shoulders, and if you don’t feel the bar on your thighs when you clean, it is wrong. This point cannot be emphasized enough: the bar being in contact with your thighs means that it’s in the proper place in balance over the mid-foot, and that you are in the correct place to jump. Make it your policy to touch your thighs each time you clean. Now, from the jumping position, with straight elbows, jump straight up in the air with the bar hanging from your arms. Don’t bend your elbows. Concentrate on the fact that you are jumping and leaving the ground. Jump as high as you can, enough that you have to fully extend your knees and hips to do it. Focus on your jump the first few times, and then focus on keeping your elbows extended. It will be normal at this point to shift your feet from the stance used for pulling into a stable position for catching the bar in the rack position. For most people, this racking stance will approximate the squat stance because it will be familiar from squatting, and because the bent knees are used to absorb the weight of the dropping body and barbell best distribute the load to the ground in this position. Don’t worry about the stance at this point unless your feet move laterally wider than your squat stance. Think hard about not bending your elbows as the bar slides down your thighs to the jumping position. Many people will try to bend their elbows instead of letting the bar slide, but don’t you be that person. If you find that you’re bending your elbows anyway, use your triceps to lock the elbows in.
Once the act of jumping with the bar in your hands and with your elbows straight is firmly embedded, jump and catch the bar on your shoulders in the rack position. Catch it in the same place you had it before, with your elbows up. The bar should stop on your shoulders, not in your hands. Slam your elbows up into the rack position from the top of the jump – go from elbows-straight directly to slammed-forward. Aim your shoulders at the bar and jam them into it without thinking about raising your elbows, as if there is no step between straight elbows and the rack position. Jumping is the key. The power clean is not an arms movement, at all, and if you first learn that a jump with straight arms is the core of the movement, you will never learn to arm-pull the bar. The jump generates the upward movement of the bar, and later, when your form is good, you will think of the jump as an explosion at the top of the pull. For now, just jump and slam the bar onto the shoulders. Each time, be sure that 1) you start from the jumping position with the bar touching the thighs and your elbows straight, 2) you actually jump, and 3) you rack the bar with your elbows up high. Check the position of the bar as it passes your chest: it should be close enough that it touches your shirt. The bar should follow a vertical line.
Rack
It should sit right on top of the frontal deltoids (the meaty part of the front of the shoulders), well away from the sternum and collarbones. This position is referred to as the rack position. The key to this position is the elbows: they must be up very high, pointed straight forward, with the humerus as nearly parallel to the floor as possible. Some people will have trouble getting into this position due to flexibility problems. A grip width adjustment usually fixes this, especially if the forearms are longer than the upper arms. Widen the grip a little at a time until the position is better. If your elbows are up high enough, the bar will clear the bony parts and sit comfortably on the bellies of the deltoid muscles. The bar should not be sitting in the hands, and the hands are not supporting any of the weight. The weight is resting on your shoulders, and your hands are trapping it in position between your arms and shoulders, just like they do in the squat. This position is secure and pain-free to the extent that you will never in your entire life clean a weight that will be too heavy to hold like this. It is imperative that you understand that this is where the bar goes and not anywhere else – not sitting on your chest, and not just carried in your
Jerk
Keeping pressure on heels, dip body by bending knees and ankles slightly. Explosively drive upward with legs, driving barbell up off shoulders. Drop body downward and split one foot forward and other backward as fast as possible while vigorously extending arms overhead.The split position places front shin vertical to floor with front foot flat on floor. The rear knee is slightly bent with rear foot positioned on toes. The bar should be positioned directly over ears at arms length with back straight.Push up with both legs. Position feet side by side by bringing front foot back part way and then rear foot forward.
Rippetoe, Mark (2012-01-13). Starting Strength (Kindle Locations 4657-4662). The Aasgaard Company. Kindle Edition.